Showing posts with label DIY Projects. Show all posts

Wednesday, February 12

My Next Victim

Just before Christmas and just before Old Man Winter put a stranglehold on the Midwest, my friend Jana and I made a shopping trip to the West Bottoms.  I wasn't looking for anything in particular and that's usually when I make the best finds.  I found this little treasure in the first store we popped in to.


I knew it was a complete redo because I could tell it had gotten wet and the foam on the back was disintegrating.  It is a great size though at only 60" wide and about 2 1/2 feet deep and was priced at $84.50.  The frame doesn't have any wiggle at all so I knew it had great bones.  I had several images saved as inspiration for future projects.


I don't have a source for this one.  Anyone have it?


I love the straight lines and vibrant colors of all these sofas.  Mine is headed into my lounge where the walls are painted Benjamin Moore's Graphite.  I thought a great vintage velvet would look great on it so I ordered up this.


It will take me a couple of weeks to whip it in to shape, but here are a few progress shots.


I take tons of progress shots throughout the process, because no matter how many times I think I'll remember exactly how it goes back together, I never do so they serve as my trail of bread crumbs!


This is always about the time I wonder what ever possessed me to take on a project like this…


So this is where we stand right now.  Another few hours of tearing it down and then I'll spend a bit of time cleaning up and staining the frame before I begin putting it all back together.  I can't wait until it can come home!


Wednesday, November 20

Chair Pair Gets An Update

This cute little duo needed an update. 


I'm amping up this little upholstery business of mine, so to get started again I agreed to do an update on a friend's cute little chairs.


One down and one to be finished later today!  My plan is to really gear up after the first of the year, so if you're in the Kansas City area and have a project you need done, send me an email at jennydover@mokancomm.net


Tuesday, March 5

This Little Light of Mine

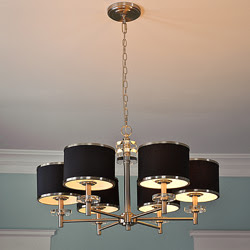
There's a saying that goes around my house quite often when talking to my children.  "Wantin' and gettin' are two different things."  Well, it seems I've had to take my own advice.  You see, this tuxedo chandelier from Z Gallerie was on my "wantin' list" for  above my island in my kitchen.


But it weighs in with a hefty $799 price tag so it didn't make it on the "gettin' list."  What you can't see from this online picture is the beautiful soft gold on the inside of the shade that casts the prettiest light. Here is a really bad iPhone picture from the display at the store.

So off to the inter webs I did go and found this as a more budget friendly option.


While it is lovely and the price was right at $229, the inside of the shades were bright white and didn't give off the soft glow I was wanting.  


Enter Rub N' Buff, one of my newest favorite friends.


I put a bit of it on a paper plate and went to town on the insides of the shades.


Six shades and a handy husband later...wait that sounds wrong.  Anyway, my handy husband did hang the light for me and this is what I ended up with.


I'm thinking for a little more than 1/4 of the cost and a little elbow grease, this little light of mine was a pretty good compromise.

Wednesday, November 28

Evolution of a Space


This is what the dining room looked like when we bought our house almost 3 years ago. (This is the previous owner's stuff)  The trim is faux painted to look like wood and not only are the walls faux painted to look like maroon leather, they are also textured. The walls in the  living room and kitchen were also textured and the kitchen walls had a nice grape and leaf motif stamped in them.  Needless to say, before even moving in we had the popcorn ceilings scraped and replaced with knock-down texture and all the walls skimmed to get rid of the texture. 


This is the third phase of the dining room as I am missing a picture of it painted yellow.  This room is directly on the left as you walk in our front door and quite a little way from the eat-in kitchen, so we actually didn't use it as a dining room all that often.


I decided to move our large dining room table into the kitchen and use this room as a lounge area.  I painted the ceiling in the bay window area the same color as the walls to try to make it disappear a bit and I also painted the ceiling a light grey and replaced the light fixture.  I found the grey club chairs on Overstock.com and they are actually very comfortable!  


In the process of making some repairs to other areas of the house, we had to tear up a bit of our wood floors at the back door.  I begged a little and we decided to take up the carpet in the "dining room" and the half bath right off the kitchen and then have all the floors refinished.  Yeah!  


This is how it looks today.  I have fabric purchased for curtains but that will probably have to wait until after the holidays.  Plans are in the works for built-ins in the alcove on the back wall and the carpet on the stairs will be replaced soon.  It has been a lengthy process but I think we will use the room much more this way.


Friday, May 4

Fun With Annie Sloan Paint


I've been wanting to try Annie Sloan's chalk paint for quite some time but just didn't have the right project to work on.  Last week our little town had its annual city wide garage sale and I picked up this little dresser for a song.


Unfortunately I got so excited that I forgot to take an official before shot of the dresser, but you can see from the top that it had a faux limed finish and that scrolled piece of trim laying in front is what I sawed off the front between the two legs.  Here are the drawers so you can see the fancy painted motif on the front.


The paints say that no sanding or priming is necessary, but in hindsight I think I would have given this thing a rough sanding only because it isn't real wood and it had that slick "plastic" finish.
I started with a coat of "Versailles" which is a really soft sage green.


Next came the second coat which I ending up combining "Duck Egg" with "Antibes Green" to get the color I wanted.


I finished up with a coat of "Graphite" and when it was completely dry came back and sanded through the finish in places to allow the other colors to come through.


Once I got it looking the way I wanted, I gave the whole thing a coat of Annie Sloan Clear Wax and buffed it to a shine.  Here is the finished product.


I may eventually change the original hardware, but for now I think it looks great in my entry!

Thursday, May 3

Retro Redo Complete

My first reupholstery project is officially complete and at home in my sitting room. Except for the new front leg that I still need to stain.    I had a blast doing it and I'm ready for more.  Do you have a project for me to practice on?


Tuesday, April 10

Lamp Love

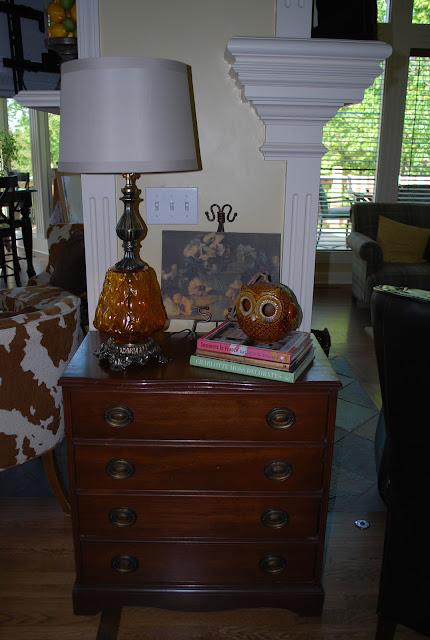
I recently purchased a couple of great lamps at Goodwill.  Although I didn't take step-by-step photos of the process.  I rewired this one because it was wired for the European electrical system.  It didn't have a shade, so I purchased a new one at Lowe's, and just like that my $2.99 Goodwill purchase looks like a gem on my counter!


The other one is a vintage beauty and I was disappointed the shade had water damage spots.


Although the lamp was in working condition, I was nervous that the old wiring may be a fire hazard.  The base of the lamp lit up too, but the plastic "hurricane" definitely made me nervous!  I took the whole thing apart and gave it a good scrub.


After everything had dried, I put it all back together using a new lamp kit.


I wanted to wire it so that the base would light up, but I had a difficult time finding a glass hurricane the right size to replace the plastic one, and I got tired of the torn-apart lamp sitting on my counter, so I just put it back together and if I find the right pieces later, I'll take it apart and fix it.  Here it is with a new shade and sitting pretty in its new spot in my house.


It really isn't difficult at all to rewire a lamp, so don't be scared of a great lamp at a garage sale or thrift shop.  

Monday, April 9

Retro Redo Part 2

My upholstery project has been progressing nicely the last couple of class sessions.  You can see my chair's original state here.  I have to admit, I made some newbie mistakes and it was a little frustrating there for a bit, but I've learned some invaluable lessons and I'm back on track.  I've been really bad at taking step-by-step photos, but here's a look at the chair in its current condition.  I still have to finish the outside back, make the seat cushion, and stain and attach the new front leg.


I really like the way it is turning out and I'm having so much fun learning to upholster.  In fact, I bought myself a new tool so I can work on some projects outside of class...


She hasn't been around long enough to acquire a nickname, but she'll get one, I know she will!


You might have missed this:

Related Posts Plugin for WordPress, Blogger...